Spring AI 2.x introduced a major shift in how tool calling works. If you're coming from Spring AI 1.x, the old .tools("toolName") approach no longer works reliably. Instead, Spring AI now requires explicit tool registration using ToolCallbacks.
In this guide, we'll walk through a clean, working example of tool calling using Spring AI 2.0.0, and more importantly - understand how it actually works so you can build production-ready systems.
The Problem We're Solving
LLMs are great at generating text, but they don't have access to real-time data. Tool calling bridges this gap by allowing the model to:
- Decide when external data is needed
- Invoke backend logic (tools)
- Use the result to generate a final response
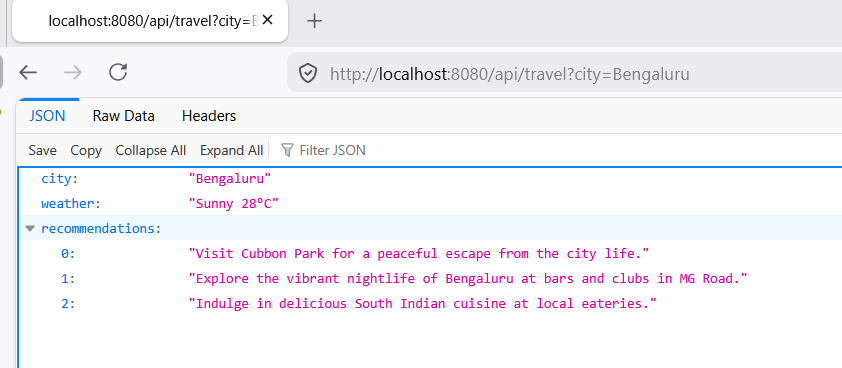
In this example, we build a travel planner that fetches weather data using a tool.
How Tool Calling Works (Mental Model)
1. User asks: "Plan a trip for Bangalore"
2. LLM decides: "I need weather data"
3. LLM calls: getWeather("Bangalore")
4. Spring executes WeatherTool
5. Tool result -> passed back to LLM
6. LLM generates final JSON response
Understanding this flow is critical. The LLM is not just generating text - it is orchestrating backend logic.
Step 1: Configure ChatClient
@Configuration
public class ChatClientConfig {

    @Bean
    public ChatClient chatClient(ChatClient.Builder builder) {
        return builder.build();
    }
}
ChatClient is the main entry point for interacting with the LLM.
Step 2: Define a Tool
@Component
public class WeatherTool {

    public record WeatherResponse(String city, String forecast) {}

    @Tool(name = "getWeather", description = "Get weather for a city")
    public WeatherResponse getWeather(String city) {
        System.out.println("Tool called: getWeather(" + city + ")");
		// Simulated API call
        return new WeatherResponse(city, "Sunny 28°C");
    }
}
Important: The tool input is a simple String. This is intentional - complex objects often cause JSON parsing issues with LLMs.
Step 3: Register Tools (Spring AI 2.x Way)
@Component
public class ToolRegistry {

    private final WeatherTool weatherTool;

    public ToolRegistry(WeatherTool weatherTool) {
        this.weatherTool = weatherTool;
    }

    public Object[] allTools() {
        return new Object[]{ weatherTool };
    }
}
In Spring AI 2.x, tools must be explicitly registered using ToolCallbacks.
Step 4: Call the LLM with Tool Support
@Service
public class TravelService {

    private final ObservedChatClient observedClient;
    private final ResponseValidator validator;
    private final ToolRegistry toolRegistry;

    public TravelService(ObservedChatClient observedClient,
                         ResponseValidator validator,
                         ToolRegistry toolRegistry) {
        this.observedClient = observedClient;
        this.validator = validator;
        this.toolRegistry = toolRegistry;
    }

    public TravelPlanResponse planTrip(String city) {

        ChatClient client = observedClient.getClient();

        ChatClient.ChatClientRequestSpec spec = client.prompt()
                .system("""
                    You are a travel planner.
                    Return ONLY valid JSON (no markdown, no explanation):
                    {
                      "city": string,
                      "weather": string,
                      "recommendations": string[]
                    }
                    MUST call getWeather tool before answering.
                """)
                .user("Plan a trip for " + city)
                .toolCallbacks(ToolCallbacks.from(toolRegistry.allTools()));

        TravelPlanResponse response =
                observedClient.call(spec, TravelPlanResponse.class);

        validator.validate(response);

        return response;
    }
}
This is where everything comes together:
.toolCallbacks(...)registers available tools- The LLM decides when to call them
.entity()maps the response into a DTO
Step 5: DTO Binding
public record TravelPlanResponse(
        String city,
        String weather,
        List<String> recommendations
) {}
Using DTOs ensures your API remains type-safe and predictable.
Step 6: Observability
@Component
public class ObservedChatClient {

    private final ChatClient chatClient;

    public ObservedChatClient(ChatClient chatClient) {
        this.chatClient = chatClient;
    }

    public <T> T call(ChatClient.ChatClientRequestSpec spec, Class<T> type) {
        long start = System.currentTimeMillis();

        T response = spec.call().entity(type);

        long duration = System.currentTimeMillis() - start;
        System.out.println("LLM call took: " + duration + " ms");

        return response;
    }
}
Tracking latency is essential when working with LLMs.
Step 7: Validation Layer
@Component
public class ResponseValidator {

    public void validate(TravelPlanResponse res) {
        if (res.city() == null || res.city().isBlank()) {
            throw new IllegalStateException("City missing");
        }
        if (res.recommendations() == null || res.recommendations().isEmpty()) {
            throw new IllegalStateException("Recommendations missing");
        }
    }
}
Never trust LLM output blindly - always validate.
Common Pitfalls
- Tool not getting called -> Strengthen system prompt
- JSON parsing errors -> Use simple tool inputs (String instead of objects)
- Hallucinated data -> Explicitly instruct LLM to use tool results
- Wrong API usage -> Use
.toolCallbacks(), not.tools()in 2.x
How This Can Be Improved
-
1. Add Retry + Guardrails
Handle malformed JSON responses by retrying with stricter prompts. -
2. Replace Object[] Registry
Use explicit tool registration for better readability and type safety. -
3. Add Structured Logging
ReplaceSystem.out.printlnwith proper logging. -
4. Add Resilience
Introduce timeout, retry, and circuit breakers. -
5. Consider Tool-First Architecture
For critical systems, call tools directly and use LLM only for reasoning. -
6. Enforce JSON Schema
Validate LLM output before mapping to DTO.
Conclusion
Spring AI 2.0.0 makes tool calling more explicit and predictable using ToolCallbacks. While this adds a bit of boilerplate, it significantly improves clarity and control. The complete source code can be found here at Github.
The key takeaway:
- Keep tools simple
- Use DTOs for structured output
- Validate everything
- Don't rely entirely on LLM decisions in production
With these principles, you can build reliable, production-grade AI integrations using Spring Boot.
