In this article we will be discussing about one to many relaionship in hibernate with annotations based configuration. We will be creating a simple employee - department one to many relationship and discuss the different annotations used in the example. We will be also discussing about unidirectional and bidirectional relationship seperately and define the configurations for each relationships along with the different optional parameters used in one to many relationship.
What is One to Many Relationship
A one to many entity relationship shows the association of an instance of an entity with multiple instances of another entity. Let us take an example of Deparment and Employee. One department can have many employees and this is one of the best example of one to many relatonship. And again when we see from employee side, then it is many to one relationship.
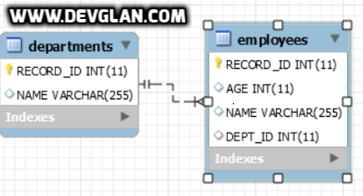
From sql perspective, table EMPLOYEES will have a foreign key constraint that will point to the primary key of table DEPARTMENTS and there can be multiple employees pointing to a single department.
Following is the sql for hibernate one to many relationships
CREATE TABLE departments
(
   RECORD_ID  INT   NOT NULL AUTO_INCREMENT,
   NAME       VARCHAR(255),
   PRIMARY KEY (RECORD_ID)
)
ENGINE=InnoDB;
CREATE TABLE employees
(
   RECORD_ID  INT            NOT NULL AUTO_INCREMENT,
   AGE        INT,
   NAME       VARCHAR(255),
   DEPT_ID    INT,
   PRIMARY KEY (RECORD_ID)
)
ENGINE=InnoDB;

ALTER TABLE employees
  ADD CONSTRAINT FK_j1ryo80krj2mrd97datx3hdry FOREIGN KEY (DEPT_ID)
  REFERENCES departments (RECORD_ID)
Environment Setup
1. JDK 7 2. Hibernate 4 3. Intellij Idea/ eclipse 4. MySql 5. Maven
Project Structure
We have 2 model classes - Department.java and Employee.java that has one to many relationship. We have Application.java that has a main method which will be used to start the application. We have hibernate.cfg.xml file that has all the hibernate configurations.
Maven Dependencies
Following are the maven dependencies required to include in pom.xml to get started.
pom.xml<dependencies> <dependency> <groupId>org.hibernate</groupId> <artifactId>hibernate-core</artifactId> <version>4.3.11.Final</version> </dependency> <dependency> <groupId>mysql</groupId> <artifactId>mysql-connector-java</artifactId> <version>5.1.38</version> </dependency> <dependency> <groupId>org.javassist</groupId> <artifactId>javassist</artifactId> <version>3.18.0-GA</version> </dependency> </dependencies>
hibernate.cfg.xml
<hibernate-configuration>
   <session-factory>
   <property name="hibernate.dialect">org.hibernate.dialect.MySQLDialect</property>
   <property name="hibernate.connection.driver_class">com.mysql.jdbc.Driver</property>
   <property name="hibernate.connection.url">jdbc:mysql://localhost/test</property>
   <property name="hibernate.connection.username">root</property>
   <property name="hibernate.connection.password">root</property>
   <property name="hibernate.hbm2ddl.auto">update</property>
   <property name="show_sql">false</property>
   <mapping class="com.devglan.model.Employee"/>
   <mapping class="com.devglan.model.Department"/>
</session-factory>
</hibernate-configuration>
Definig Hibernate Entities
As discussed above, we have 2 entities, Department and Employee. So, let us define them first and then we will discuss about the different annotations used in the one to many relationship. Following annotation configurations is for unidirectional relationship.
package com.devglan.model;

import javax.persistence.Column;
import javax.persistence.Entity;
import javax.persistence.GeneratedValue;
import javax.persistence.GenerationType;
import javax.persistence.Id;
import javax.persistence.Table;

@Entity
@Table(name = "EMPLOYEES")
public class Employee {

	@Id
	@GeneratedValue(strategy = GenerationType.IDENTITY)
	@Column(name = "RECORD_ID")
	private Integer id;

	@Column(name = "NAME")
	private String name;

	@Column(name="AGE")
	private Integer age;

	//getters and setters goes here
Department.java
package com.devglan.model; import java.util.List; import javax.persistence.Column; import javax.persistence.Entity; import javax.persistence.GeneratedValue; import javax.persistence.GenerationType; import javax.persistence.Id; import javax.persistence.JoinColumn; import javax.persistence.OneToMany; import javax.persistence.Table; @Entity @Table(name = "DEPARTMENTS") public class Department { @Id @GeneratedValue(strategy = GenerationType.IDENTITY) @Column(name = "RECORD_ID") private Integer id; @Column(name = "NAME") private String name; @OneToMany @JoinColumn(name ="DEPT_ID") private Listemps; //getters and setters goes here
Let us discuss about unidirectional and bidirectional relationship based on above examples in next section
 Other Interesting Posts
Spring Hibernate Integration Example with JavaConfig
Object Relational Mapping in Java
Hibernate Different Annotations Example
Hibernate One to Many Mapping Example
Hibernate Many to Many Relationship Example
Hibernate Inheritance Example
Unidirectional One to Many Relationships
Unidirectional relationship means the relationship between the entities can be traversed in a single direction. For example, in the above Department entity, Department.java has reference to Employee.java but Employee class does not relate to Department class in any manners. You can see @JoinColumn annotation is used in Department class though the foreign key will be created in EMPLOYEES table.
One thing to observe here is though the relationship is unidirectional, we are not using mappedBy attribute in the annotation @JoinColumn because associations marked as mappedBy must not define database mappings like @JoinTable or @JoinColumn.
In many cases, unidirectional relationship is preferred unless you require to traverse the entity graph from both side of relationship.
Bidirectional One to Many Relationships
In case of Bidirectional One to many relationship, you have freedom to traverse the relationship from both the direction. Either you can traverse Employee from Department side or you can traverse Department from Employee side. But above entity configurations is for unidirectional one to many relationship. Let us define bidirectional relationship now.
You require to have following changes in Department.java for bidirectional relations.
@OneToMany(mappedBy = "dept") private Listemps;
Following changes are required in Employee.java. We have added @ManyToOne/span> here.
	@ManyToOne
	@JoinColumn(name ="DEPT_ID")
	private Department dept;
Now let us define our Application.java that will make entries in EMPLOYEES and DEPARTMENT table
Application.javapackage com.devglan.model; import org.hibernate.Session; import org.hibernate.SessionFactory; import org.hibernate.boot.registry.StandardServiceRegistryBuilder; import org.hibernate.cfg.Configuration; public class Application { public static void main(String[] args) { createDepartment(); } public static SessionFactory getSessionFactory() { Configuration configuration = new Configuration().configure(); StandardServiceRegistryBuilder builder = new StandardServiceRegistryBuilder() .applySettings(configuration.getProperties()); SessionFactory sessionFactory = configuration .buildSessionFactory(builder.build()); return sessionFactory; } public static void createDepartment() { System.out.println("****************Creating Department*************"); Department dept = new Department(); dept.setName("Science"); Employee emp1 = new Employee("John", 23); Employee emp2 = new Employee("Rohan", 25); dept.setEmps(Arrays.asList(emp1,emp2)); Session session = getSessionFactory().openSession(); session.beginTransaction(); session.save(dept); session.save(emp1); session.save(emp2); session.getTransaction().commit(); session.close(); System.out.println("Employee Created Successfully" + dept.toString()); } }
Optional Elements in OneToMany Annotation
There are many optional elements which can be used with annotations @OneToMany. Let us discuss them one by one.
targetEntity - If you are using java generics to define the collection, then this propery is optional. It denotes the entity class that is target of the association. e.g. @OneToMany(target = Employee.class)
cascade - It defines the flow of operations to associated entities. By default, none of the operations are cascaded. e.g. - @OneToMany(cascade = CascadeType.ALL)
fetch - By default fetch type is Lazy in all the relationship except for OneToOne. It defines whether the associated entities be fetched lazily or eagerly. e.g. - @OneToMany(fetch = FetchType.EAGER)
orphanRemoval - If this property is set to true, then cascade type remove is applied to entities that have been removed from the relationship. e.g. - @OneToMany(orphanRemoval = true)
mappedBy - mappedBy represent the entity that owns the relationship meaning the corresponding table that has foriegn key column and this element is specified on the non-owning side of the association.e.g. - @OneToMany(mappedBy = "dept")
Run Application
Run Application.java as a java application and you can see employee and department entries in the DB.
I hope this article served you whatever you were looking for. If you have anything that you want to add or share then please share it below in the comment section.
Download the Source


